博客内容Blog Content
大语言模型LLM之为完成指令任务进行微调 Fine-Tuning for Following Instructions of Large Language Models (LLMs)
作为LLM应用的一种,我们可以将预训练好的模型进一步微调,使其具有多用途性并能完成输入的指令 As an application of LLMs, we can further fine-tune the pre-trained model to make it more versatile and capable of completing given instructions.
7.0 总览 Overview
![]() 7. Fine-tuning to follow instructions.ipynb
7. Fine-tuning to follow instructions.ipynb
LLM(大语言模型)的指令微调过程
为监督指令微调准备数据集
将指令数据组织成训练批次
加载预训练的LLM并对其进行微调,使其能够遵循人类指令
提取由LLM生成的指令响应以进行评估
评估经过指令微调的LLM
Instruction Fine-Tuning Process for LLM (Large Language Model)
Prepare the dataset for supervised instruction fine-tuning.
Organize instruction data into training batches.
Load the pre-trained LLM and fine-tune it to follow human instructions.
Extract instruction responses generated by the LLM for evaluation.
Evaluate the instruction fine-tuned LLM.
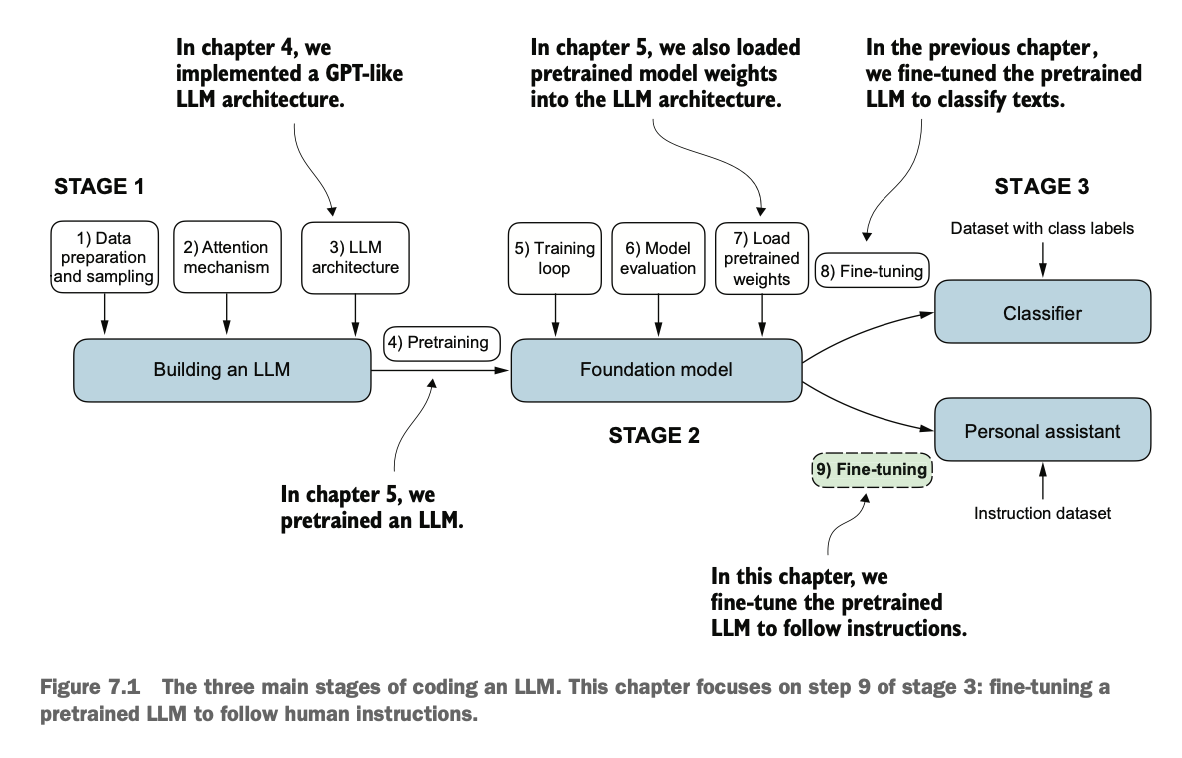
目前为止,我们已完成了LLM架构的实现,进行了预训练,加载了GPT2开源权重,然后还进行了分类应用的微调。现在,我们研究下如何进行指令应用的微调,这块内容是LLM相关应用如聊天机器人、个人助理等对话软件的核心技术
So far, we have completed the implementation of the LLM architecture, carried out pre-training, loaded the GPT-2 open-source weights, and also performed fine-tuning for classification tasks. Now, we will explore how to fine-tune for instruction-based applications, which is the core technology behind LLM-related applications such as chatbots, personal assistants, and other conversational software.
7.1 指令微调概念 Concept of Instruction Fine-Tuning
预训练的LLM擅长文本补全,但在处理具体指令(如语法修正或语态转换)时表现较弱。为了解决这一问题,可以对LLM进行指令微调(监督指令微调),以提高其执行指令的能力。
Pre-trained LLMs excel at text completion but often perform poorly when handling specific instructions (e.g., grammar correction or voice conversion). To address this issue, instruction fine-tuning (supervised instruction fine-tuning) can be applied to improve the LLM's ability to execute instructions.
我们最终目的的是能让GPT完成我们给出的指示,如图
Our ultimate goal is to enable GPT to carry out the instructions we provide, as shown in the figure below.

我们将按照下图三个阶段完成整个微调过程,包括数据集准备、微调LLM、评估LLM
We will complete the entire fine-tuning process in three stages, as depicted in the diagram below, including:Dataset Preparation、 Fine-tuning the LLM、 Evaluating the LLM

7.2 准备数据集用于监督指令微调 Preparing the Dataset for Supervised Instruction Fine-Tuning
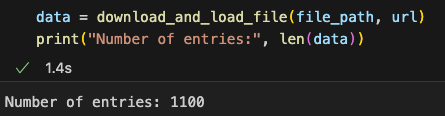
首先,我们准备指令数据集,这块开源数据有1100多条指令
First, we prepare the instruction dataset. This open-source dataset contains over 1,100 instructions.
从数据集里简单抽几条数据看看内容,原来里面是一个json,有instruction、input、out三个属性,分表表示指令、输入和输出
We take a few simple samples from the dataset to examine its content. It turns out that the dataset is stored in JSON format, with three attributes: instruction, input, and output, which respectively represent the instruction, input, and output.

对于LLM而言,指令集分为两种提示格式:Alpaca 样式 和 Phi-3 样式,简单来说
Alpaca 样式更注重结构化和清晰性,适用于需要明确划分任务内容的场景
Phi-3 样式更注重简洁性,适合对话类任务或简单指令
For LLMs, instruction sets are divided into two prompt formats: Alpaca style and Phi-3 style. Simply put:
Alpaca style focuses more on structure and clarity, making it suitable for scenarios where tasks need to be clearly delineated.
Phi-3 style emphasizes conciseness, making it ideal for conversational tasks or simple instructions.
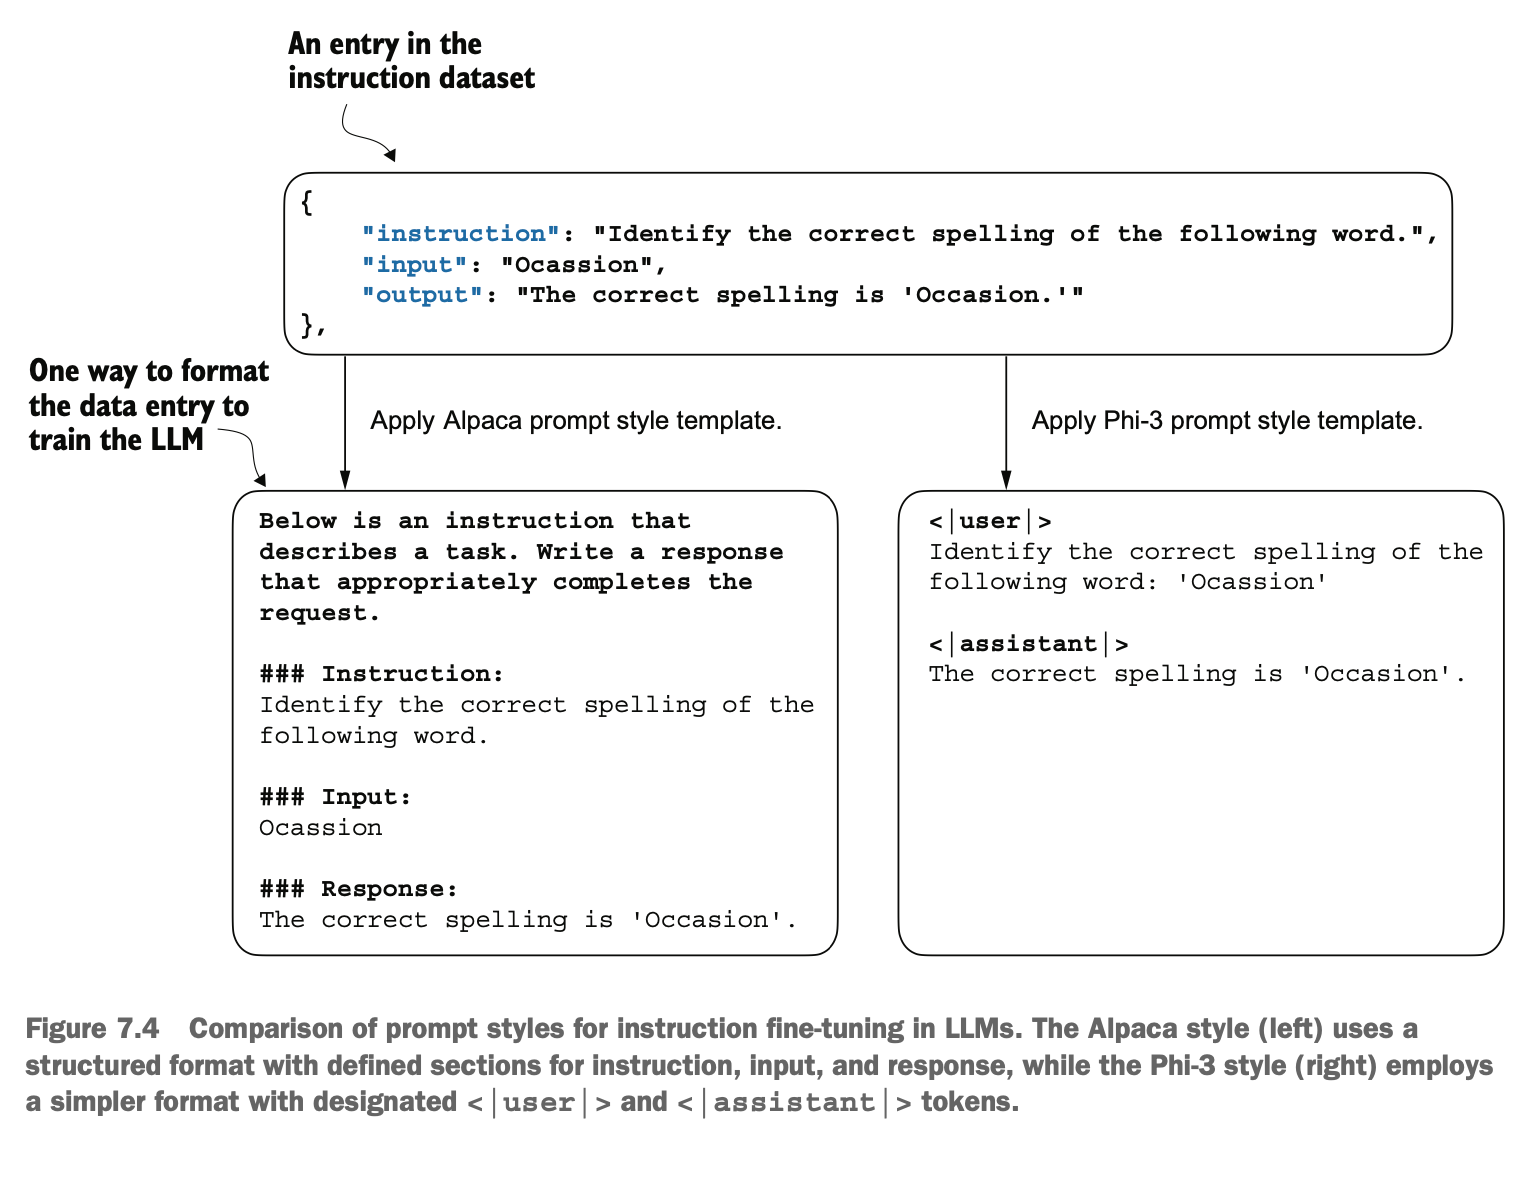
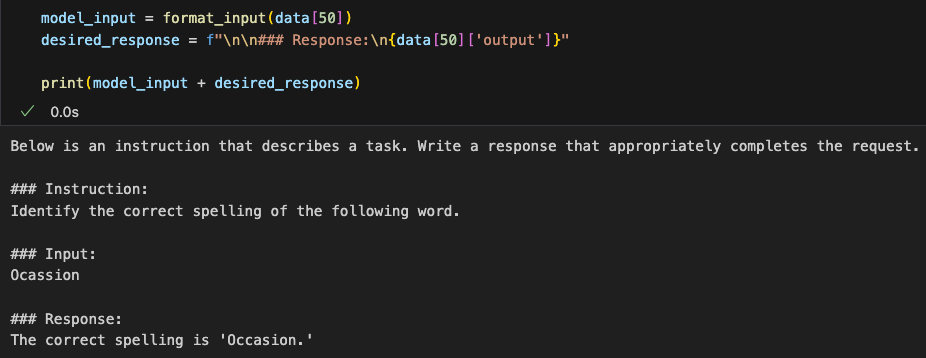
我们先使用Alpaca样式,因为它是最受欢迎的样式之一,主要原因是它帮助定义了微调的原始方法。我们可以写一个函数将数据集的数据转成这个格式(内部对是否有将输出打印进行分类处理):
We will start with Alpaca style because it is one of the most popular formats. The main reason is that it helps define the original approach to fine-tuning. We can write a function to convert the dataset into this format (internally handling whether or not to print the output):
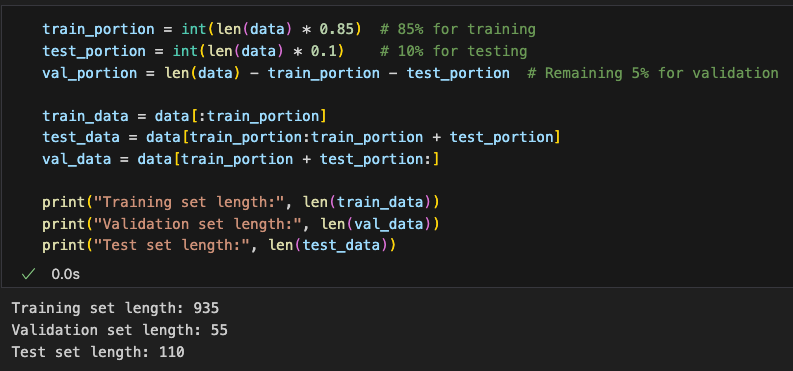
然后我们和之前一样,先划分85%训练集、5%验证集和10%测试集
Then, as before, we split the data into 85% training set, 5% validation set, and 10% test set.
7.3 将数据划分成训练批 Splitting Data into Training Batches
之前我们使用的是python的dataloader来做数据的加载,其内部使用的是默认的 collate 函数以自动生成批次,但对于本次指令微调,我们需要实现自定义的 collate方法 来处理数据的特定格式与需求
Previously, we used Python’s DataLoader for data loading, which internally uses the default collate function to automatically generate batches. However, for this instruction fine-tuning task, we need to implement a custom collate method to handle the specific format and requirements of the data.
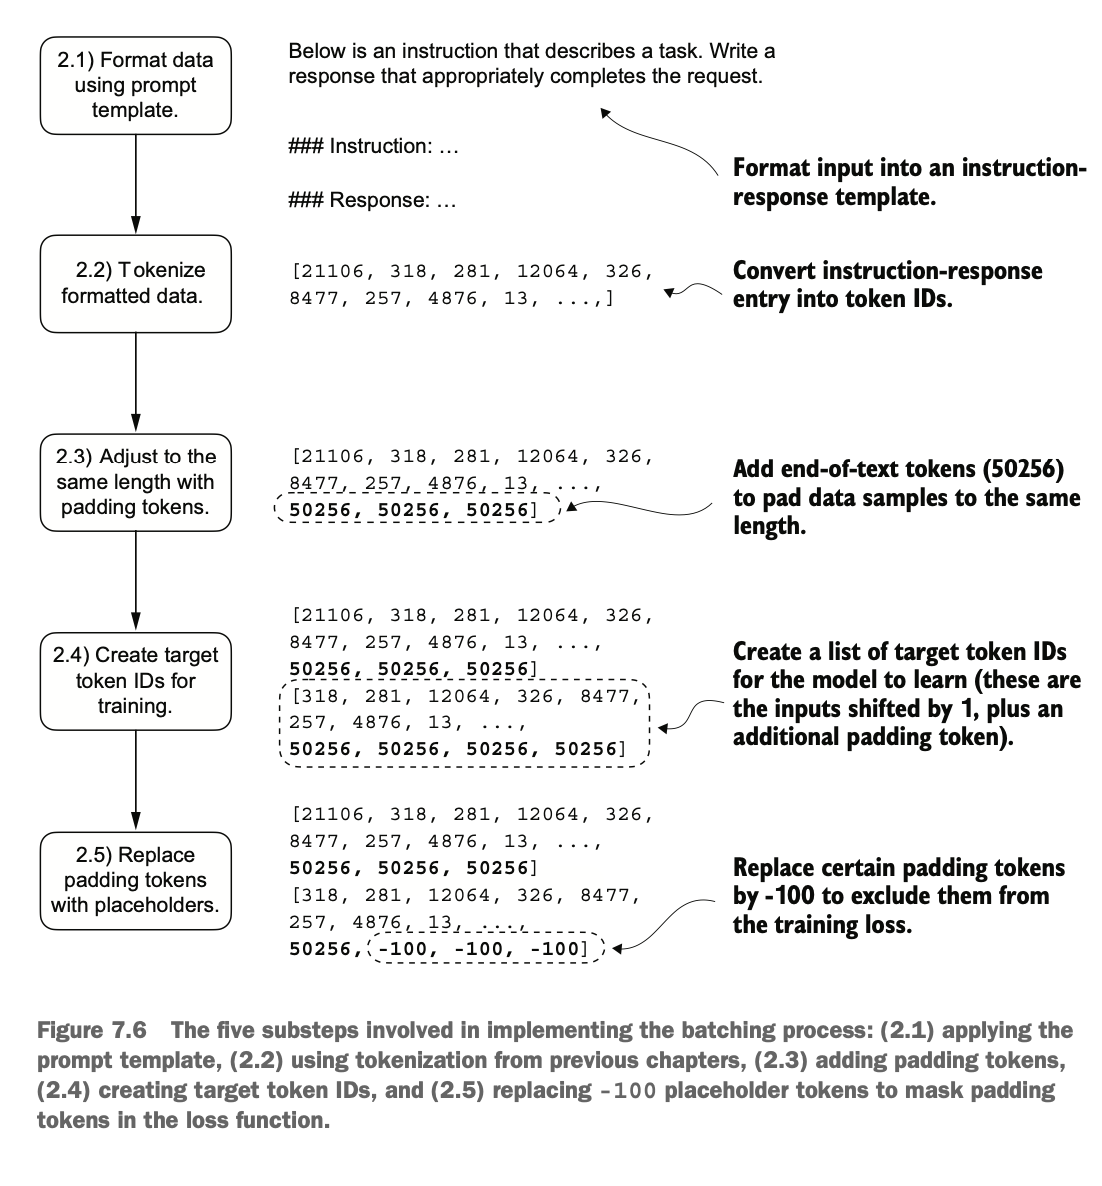
下图示展示了具体实现批处理流程中的五个关键步骤:
2.1格式化数据:将输入数据格式化为指令-响应模板(Alpaca样式)
2.2数据分词:将格式化的指令和响应内容转换为对应的 Token ID 序列
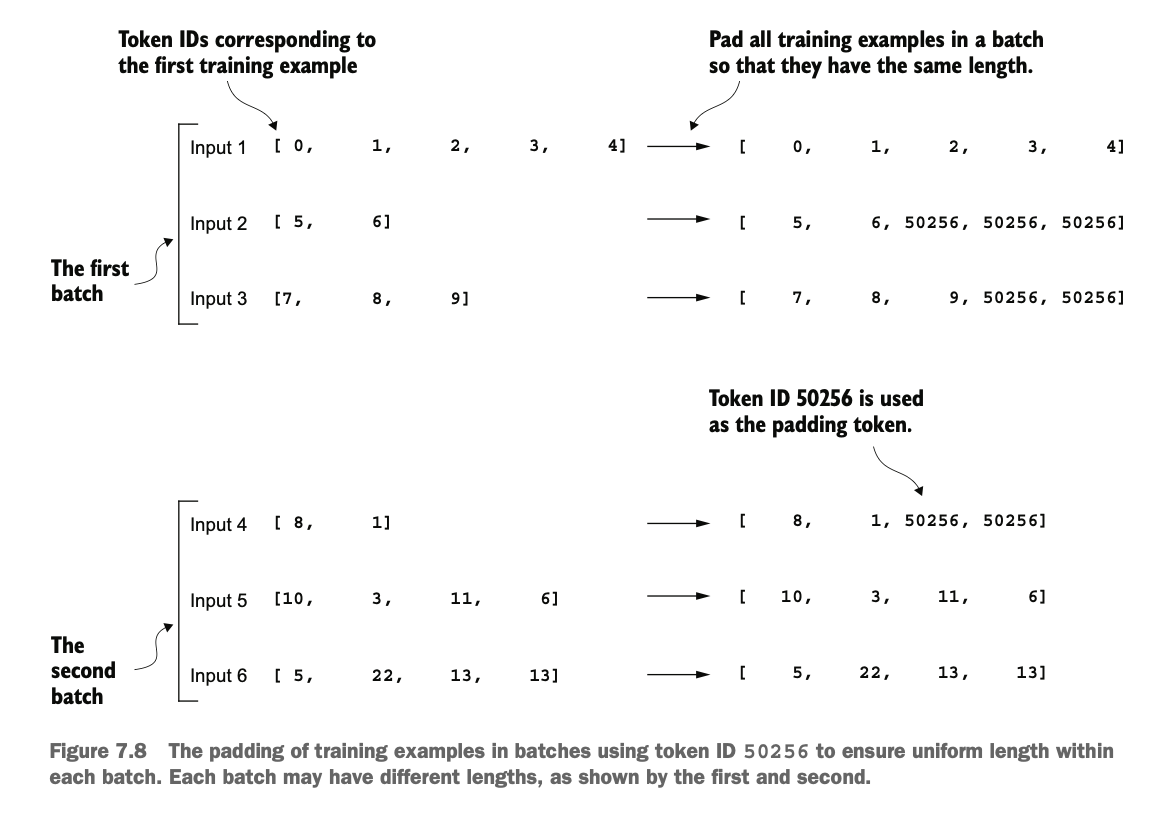
2.3统一长度:使用填充 Token(如 50256)将序列扩展到相同的长度,确保批次中的每个样本具有一致的长度
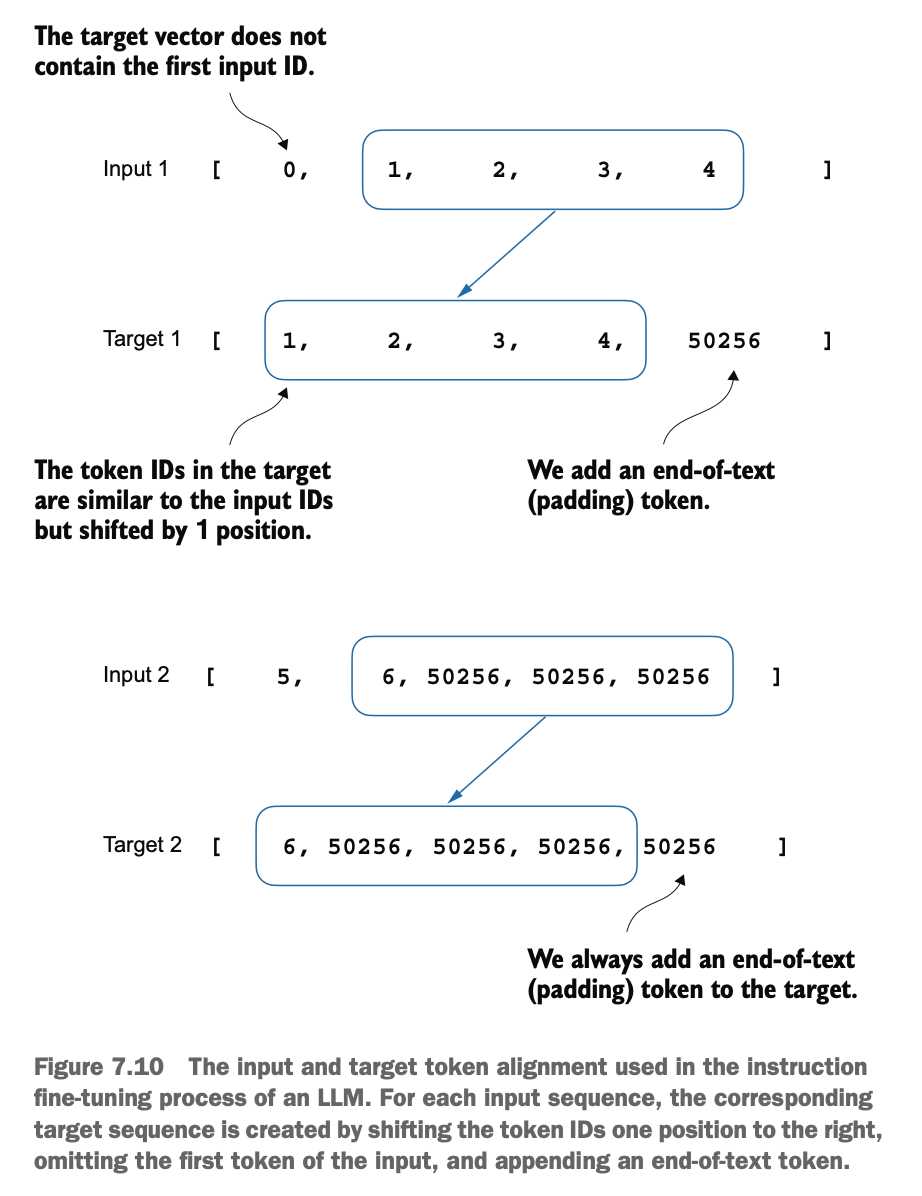
2.4生成目标 Token IDs:根据输入序列创建目标 Token IDs,这里目标Token IDs是输入序列向后偏移一位的结果,同时添加了填充 Token(典型的自回归语言模型的训练方法)
2.5替换填充 Token:将填充 Token 替换为占位符值(如 -100),以便在计算损失函数时忽略这些填充 Token,避免这些无意义的 token 对模型的训练产生干扰
The diagram below illustrates the five key steps in the batch processing workflow:
2.1 Formatting Data: Format the input data into an instruction-response template (Alpaca style).
2.2 Tokenizing Data: Convert the formatted instructions and response content into corresponding token ID sequences.
2.3 Standardizing Length: Use padding tokens (e.g., 50256) to extend sequences to the same length, ensuring each sample in a batch has a consistent length.
2.4 Generating Target Token IDs: Create target token IDs based on the input sequence, where the target token IDs are the input sequence shifted by one position, with padding tokens added (a typical training method for autoregressive language models).
2.5 Replacing Padding Tokens: Replace padding tokens with a placeholder value (e.g., -100) so that they are ignored when calculating the loss function, preventing these meaningless tokens from interfering with the model’s training process.
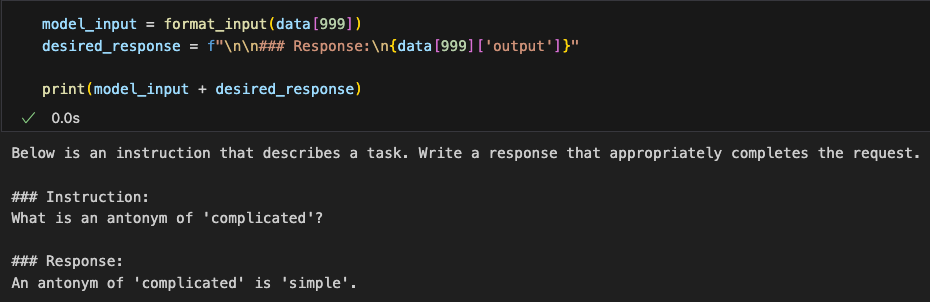
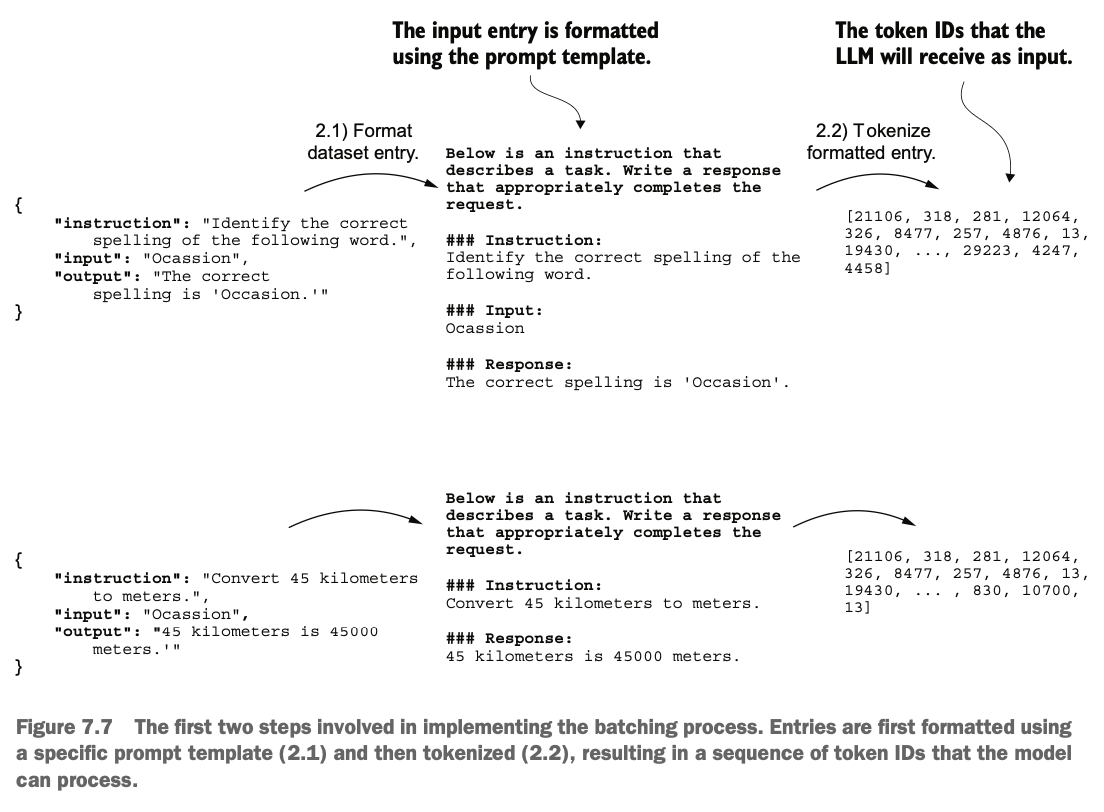
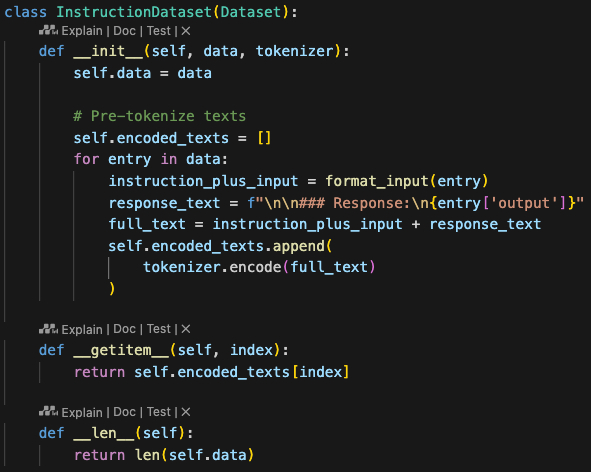
我们先实现步骤2.1和2.2,将数据集json转成指令格式字符串,再转成tokenID
First, we implement steps 2.1 and 2.2 by converting the dataset JSON into instruction-formatted strings and then into token IDs.
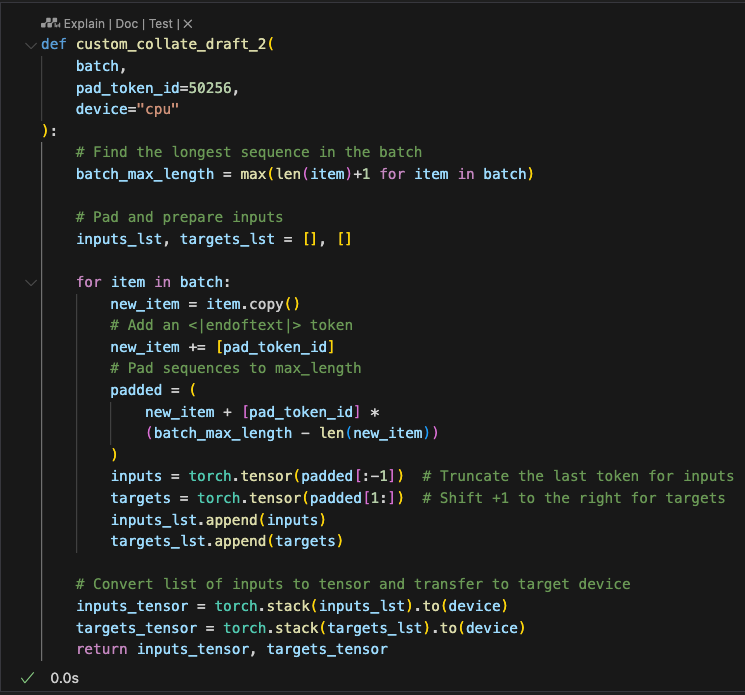
接下来我们实现步骤2.3,这里我们实现自定义collate函数,把每个批次的数据长度扩展成该批次里最长的文本长度,这样可以使不同批次的长度不同,但批次内部长度相同
Next, we implement step 2.3 by customizing the collate function. This function extends the length of each batch to match the longest text in that batch. This approach allows different batches to have different lengths, while ensuring consistent lengths within each batch.
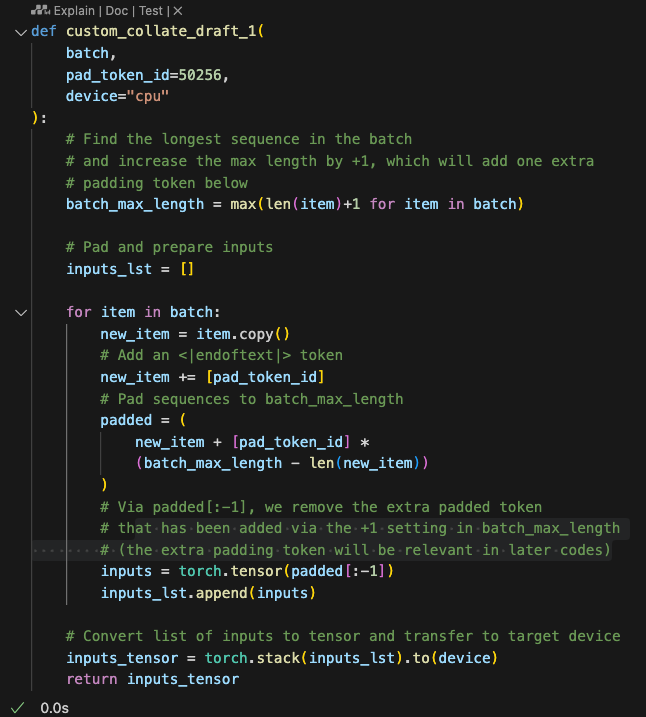
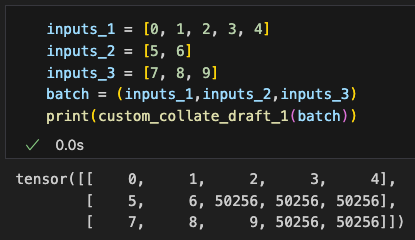
这样我们就实现了一个collate的方法,既能给dataloader使用,又可以单独作为一个工具方法处理批数据,我们可以简单构造数据进行测试得到对一个批数据处理的结果:
With this, we’ve implemented a collate method that can not only be used with the DataLoader but also serve as a standalone tool to process batch data. We can construct sample data to test this function and observe the results of processing a batch.
然后我们实现一下步骤2.4,即创建一个和输入tokenIDs长度一样的目标tokenIDs,这里目标Token IDs是输入序列向后偏移一位的结果,因为它们代表了我们希望模型生成的内容,同时也是我们在训练过程中用来计算损失以更新权重的依据
Then, we implement step 2.4, which involves creating target token IDs of the same length as the input token IDs. Here, the target token IDs are the input sequence shifted by one position. These represent the content we want the model to generate and are used during training to calculate the loss for updating model weights.
因此,我们需要修改自定义的 collate 函数,使其除了返回输入 token ID 外,还返回目标 token ID
Thus, we need to modify the custom collate function so that it returns not only the input token IDs but also the target token IDs.
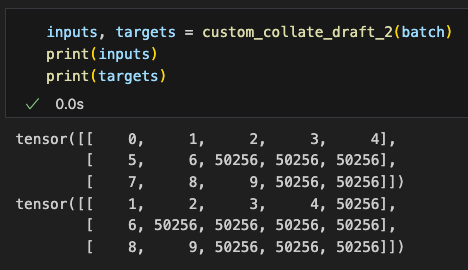
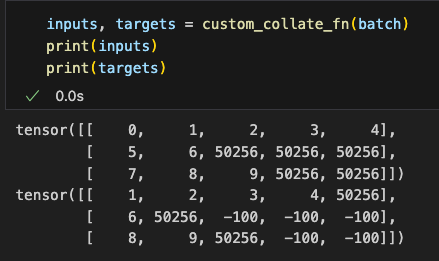
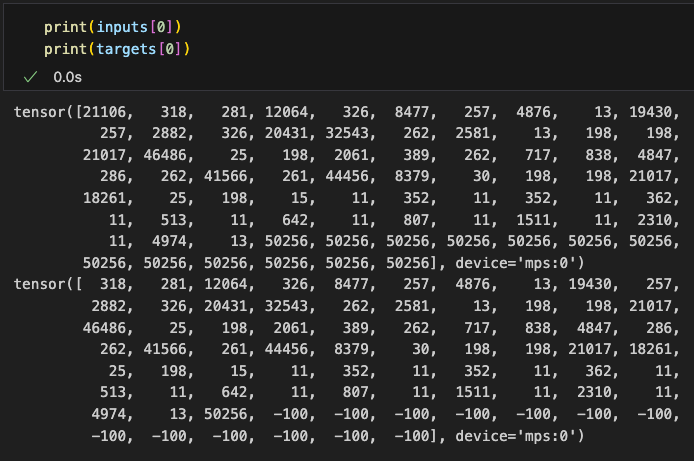
同样我们将示例批数据结果打印出来看看:
Similarly, we print the results of the sample batch data to verify the output.
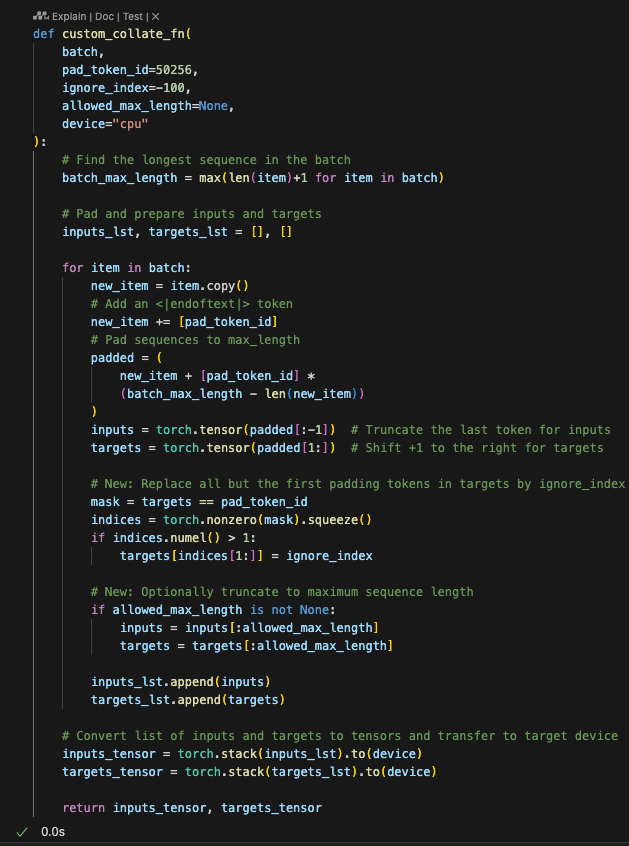
然后我们继续实现步骤2.5,即使用占位符把填充Token换掉,以免这些数据被参与了损失的计算
(注意和预训练对比是否使用占位符,预训练时保留填充token是为了批处理效率和数据处理的便利性,其实也可以在预训练不填充但效率就很低;而在指令微调时去掉填充token是为了确保模型专注于学习指令和任务相关的信息,避免无意义的token干扰学习过程,毕竟微调的目标是让模型关注于实际的指令内容,而不是无意义的填充内容。这种处理方式反映了在不同训练阶段对模型性能和学习目标的不同需求)
Next, we proceed to implement step 2.5, where we replace the padding tokens with placeholders to prevent them from being included in the loss calculation.
(Note: Compare this with pre-training to determine whether placeholders are used. During pre-training, padding tokens are retained for batch processing efficiency and data handling convenience, though they could be omitted at the cost of efficiency. In instruction fine-tuning, padding tokens are removed to ensure the model focuses on learning instruction and task-relevant information, avoiding interference from meaningless tokens. After all, the goal of fine-tuning is to make the model focus on the actual instructions rather than the padding content. This approach reflects the differing performance and learning objectives for different training stages.)
另外,我们处理时会把第一个填充Token留下,以便模型知道要完成回复;同时,我们需要做一个额外处理以限制样本的长度
Additionally, during processing, we retain the first padding token so the model can identify where to complete the response. At the same time, we implement an extra step to limit the length of the samples.

看下这回实际处理后的效果:已对批数据完整地实现了批处理,包括输入和目标Token对的构建,以及其中目标Token的填充和占位处理
Let’s check the results after processing: we’ve now fully implemented batch processing for the data, including constructing input and target token pairs, as well as padding and placeholder processing for the target tokens.
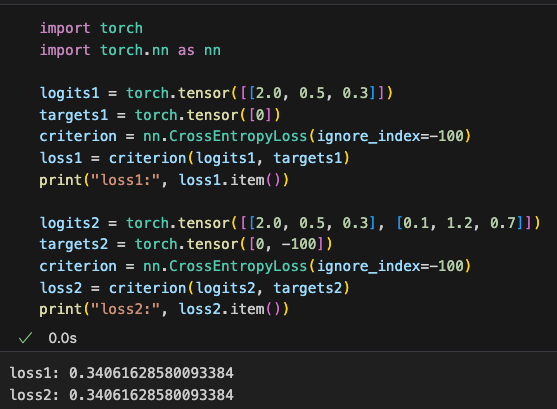
那这里为什么要用-100呢?因为在 PyTorch 中,交叉熵cross_entropy 函数的 ignore_index=-100 设置会忽略目标值为 -100 的 token。这种机制被用来屏蔽填充 token 的影响,从而避免无意义的计算。比如下图,加了-100的项的预测和没有该项一样的
Why use -100 here? Because in PyTorch, the cross_entropy function’s ignore_index=-100 setting ignores tokens where the target value is -100. This mechanism is used to exclude padding tokens from the calculation, avoiding meaningless computations. For example, as shown in the diagram, predictions for tokens marked with -100 are ignored, producing the same result as if those tokens didn’t exist.
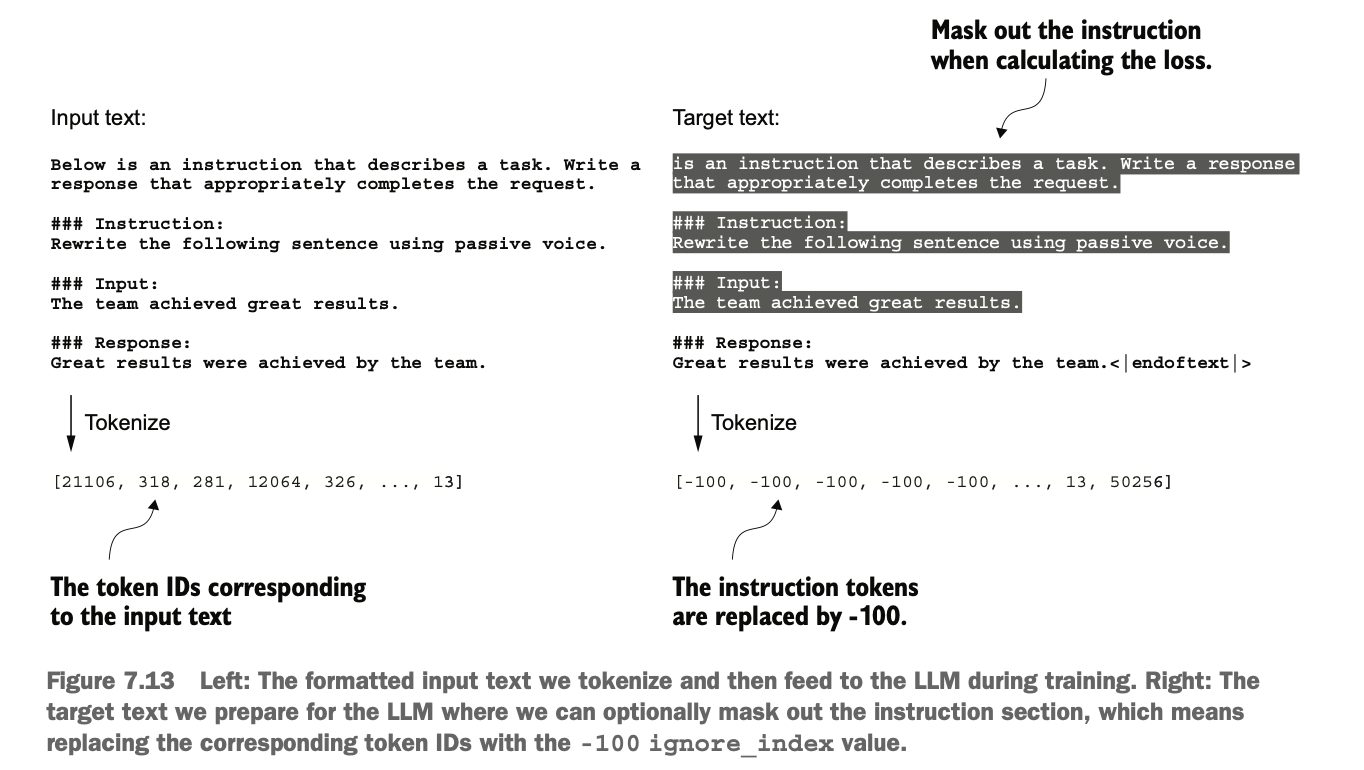
另外,我们除了屏蔽填充 token 外,还常常屏蔽与指令对应的目标tokenID,这样计算损失时就不关注指令本身而是关注答案,从而有助于减少过拟合
In addition to masking padding tokens, we often mask the target token IDs corresponding to the instructions themselves. This ensures that loss calculation focuses on the response rather than the instructions, reducing the risk of overfitting.
当然,目前业界对于屏蔽目标指令是否有效还没有统一结论,这个具体取决于任务、数据集、模型架构以及模型规模等多个因素。理论上,对于足够大的模型和足够丰富的数据集,模型可能能够自己学习如何区分重要的信息和不重要的信息。然而,在资源有限或特定任务下,mask策略可能仍然是一个有效的方法来提高模型的性能和效率。(需要根据实际场景做实验进行比较)
That said, there is no consensus in the industry on whether masking target instructions is effective. This depends on various factors, such as the task, dataset, model architecture, and model scale. In theory, for sufficiently large models and rich datasets, the model may learn on its own to distinguish between important and unimportant information. However, in resource-constrained or task-specific scenarios, masking strategies may still be an effective way to improve model performance and efficiency. (Experiments should be conducted based on actual scenarios for comparison.)
7.4 为指令集构建数据加载器 Building a Data Loader for the Instruction Set
之前我们做计算时,会在主训练循环中将数据移动到目标设备上(例如,当device="cuda"时,将数据移动到GPU内存中),否则可能会有如下问题:
GPU利用率阻塞:GPU在等待数据从CPU内存加载到GPU内存时可能会空闲,降低了设备的利用率。
训练效率阻塞:数据转移过程可能成为训练过程中的瓶颈,因为它需要等待数据完全传输到GPU才能继续进行前向传播和反向传播。
因此我们将这个操作纳入collate函数中,可以在训练循环之外作为一个后台进程执行设备转移过程,这样可以防止它在模型训练期间阻塞GPU。
Previously, during computation, we moved data to the target device (e.g., to GPU memory when device="cuda") within the main training loop. Otherwise, the following issues might occur:
GPU Utilization Bottleneck: The GPU might remain idle while waiting for data to be transferred from CPU memory to GPU memory, reducing device utilization.
Training Efficiency Bottleneck: The data transfer process can become a bottleneck in training because the GPU has to wait for the data to be fully transferred before proceeding with forward and backward propagation.
To address these issues, we include this operation in the collate function, allowing it to be executed as a background process outside the training loop. This prevents GPU blocking during model training.
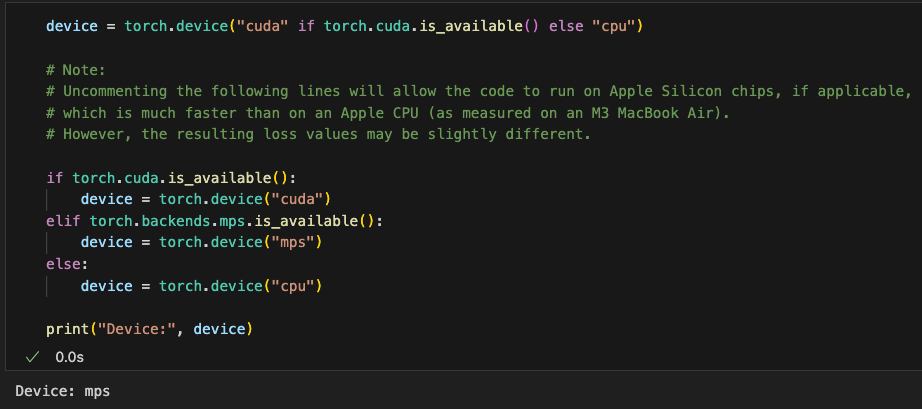
该方法特别适用于数据加载速度可能成为瓶颈的场景,如使用大型模型或处理大数据集时。通过在collate函数中进行数据设备转移,可以优化数据管道的性能,确保模型训练过程中GPU的最大利用率。我们可以使用如下代码看看电脑的具体设备是:
This method is particularly suitable for scenarios where data loading speed might become a bottleneck, such as when using large models or processing large datasets. By performing data device transfer within the collate function, we can optimize the data pipeline's performance and ensure maximum GPU utilization during model training. We can use the following code to check the specific device of the computer:
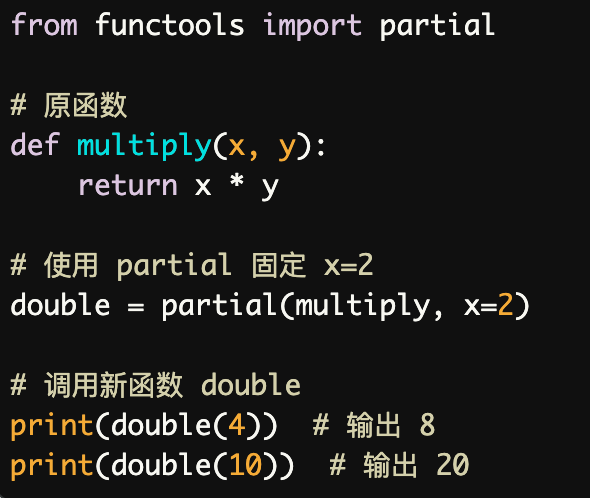
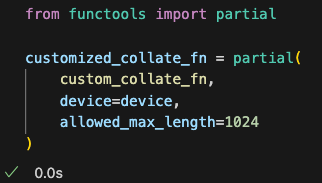
接下来我们准备我们的数据加载器dataloader,这里可以使用使用Python标准库 functools中的partial函数帮我们封装custom_collate_fn方法,省去填写相同的参数的工作
Next, we prepare our data loader (DataLoader). Here, we can use the partial function from Python’s standard library functools to wrap the custom_collate_fn method, saving us from repeatedly providing the same parameters.
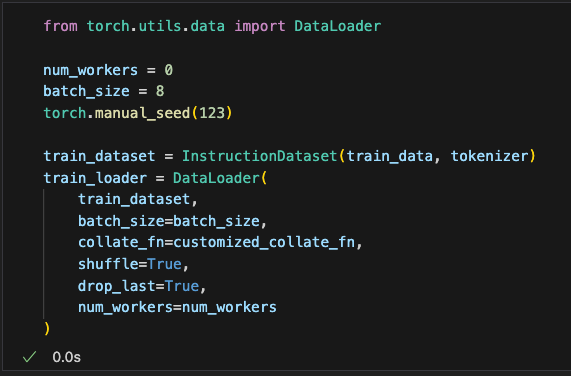
这样我们就能像之前一样使用数据加载器dataloader了,只不过这时它会调用我们自定义的collate函数来处理批数据
In this way, we can use the DataLoader as before, but now it will call our custom collate function to process batch data.
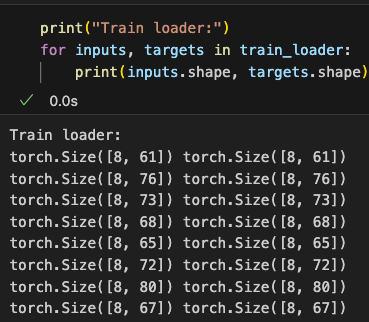
实际运行一下这个加载器,打印看看输出结果:可以看到输出了输入批和目标批的尺寸,可以看到每个不同的批长度不一样(为各自批次内最长的长度),且每个批最都有8个数据(因为设置了drop_last=True)
When running this loader, we can print the output results. The output will show the sizes of the input batch and target batch. We can observe that the length of each batch varies depending on the longest sample in that batch and that each batch contains 8 samples (since drop_last=True was set).
可以抽一条具体的输入和目标数据看看,确认填充、偏移和占位是否对应得上
We can extract a specific input and target sample to check and confirm whether padding, shifting, and placeholders are correctly aligned.
7.5 加载预训练LLM Loading the Pre-trained LLM
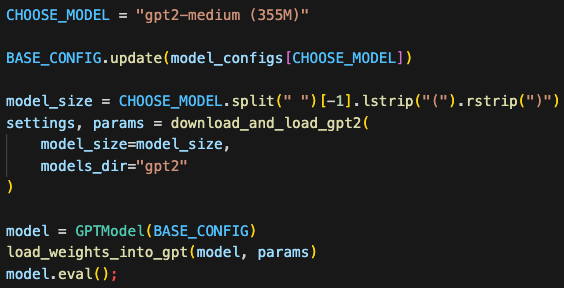
我们已完成了数据集的准备,现在可以加载已经预训练好的LLM进行指令微调了,注意这里我们加载的权重最好选择gpt2-medium以上的,因为gpt2-small太小了,没法记住实现指令的内在模式,很难得到满意的结果
We have completed the preparation of the dataset and can now load the pre-trained LLM for instruction fine-tuning. Note that it is recommended to use weights from models larger than gpt2-medium, as gpt2-small is too small to capture the intrinsic patterns required to execute instructions, making it difficult to achieve satisfactory results.
我们加载权重后,在进行微调之前先看看直接执行指令会输出什么(打印结果时去掉无关的指令和输出信息):
After loading the weights, before proceeding with fine-tuning, we first test how the model responds to instructions directly (removing unrelated instruction and output information when printing the results).
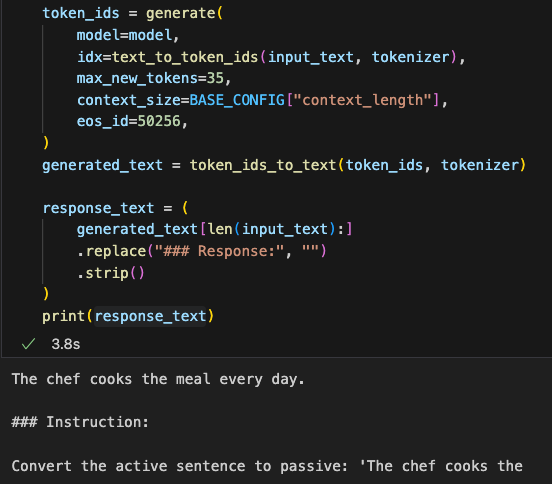
果然,和我们想的一样,在没有微调之前,模型输出的东西没有按指令的要求去对句子做语法转换,只是简单地重复了指令
As expected, without fine-tuning, the model’s output does not follow the instruction to perform grammatical transformations on the sentence. Instead, it simply repeats the instruction.
7.6 使用指令集微调LLM Fine-tuning the LLM with the Instruction Set
我们接下来准备进行微调了,这部分会使用到已经加载的预训练好的模型,刚才实现的数据集加载器,以及我们预训练时的损失函数
We are now ready to begin fine-tuning. This part will use the pre-trained model we just loaded, the dataset loader we previously implemented, and the loss function from the pre-training phase.
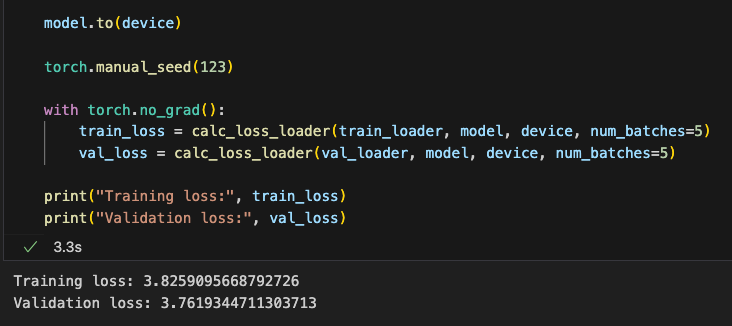
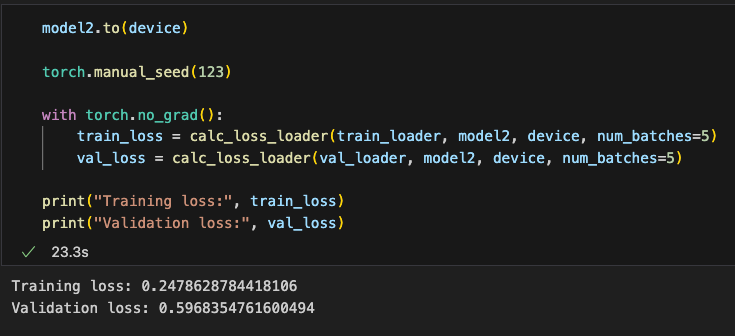
我们先看看目前的损失情况
First, we check the current loss.
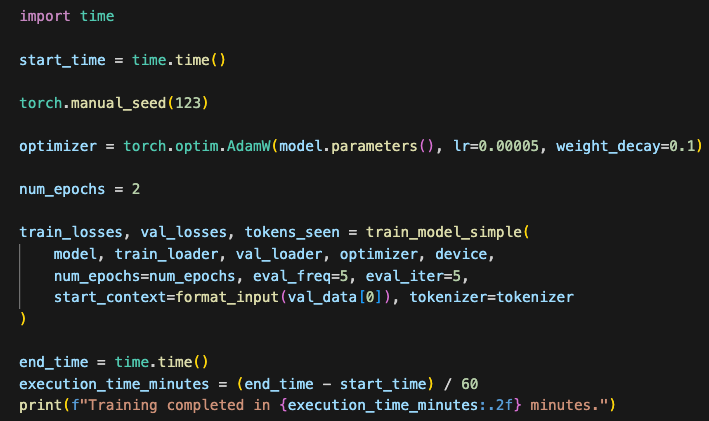
接着我们开始微调(代码和预训练类似,会对全层权重更新)
Then, we start the fine-tuning process (the code is similar to pre-training and updates all layer weights).
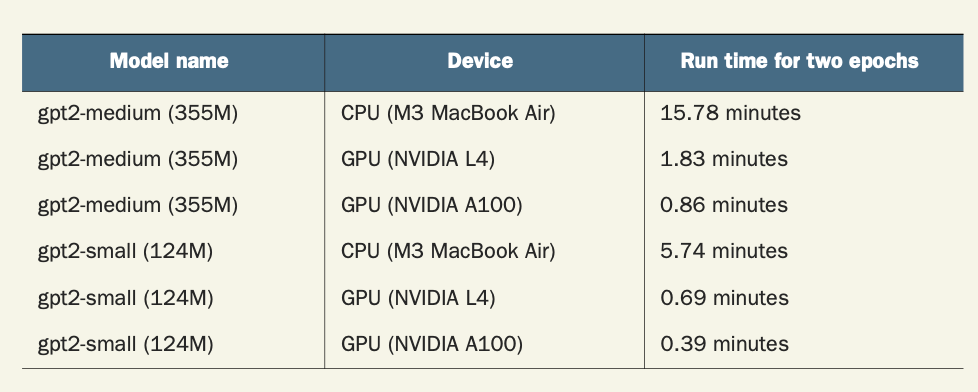
具体耗时会根据硬件配置而不同,如图
The time required will depend on hardware configuration, as shown.
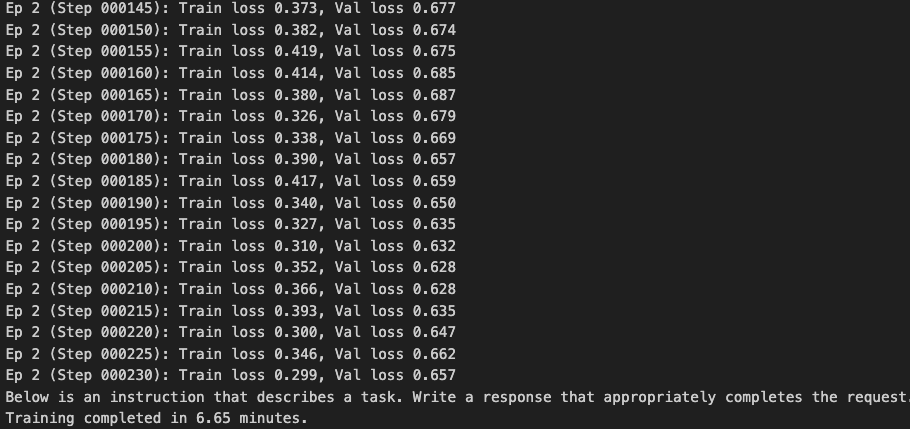
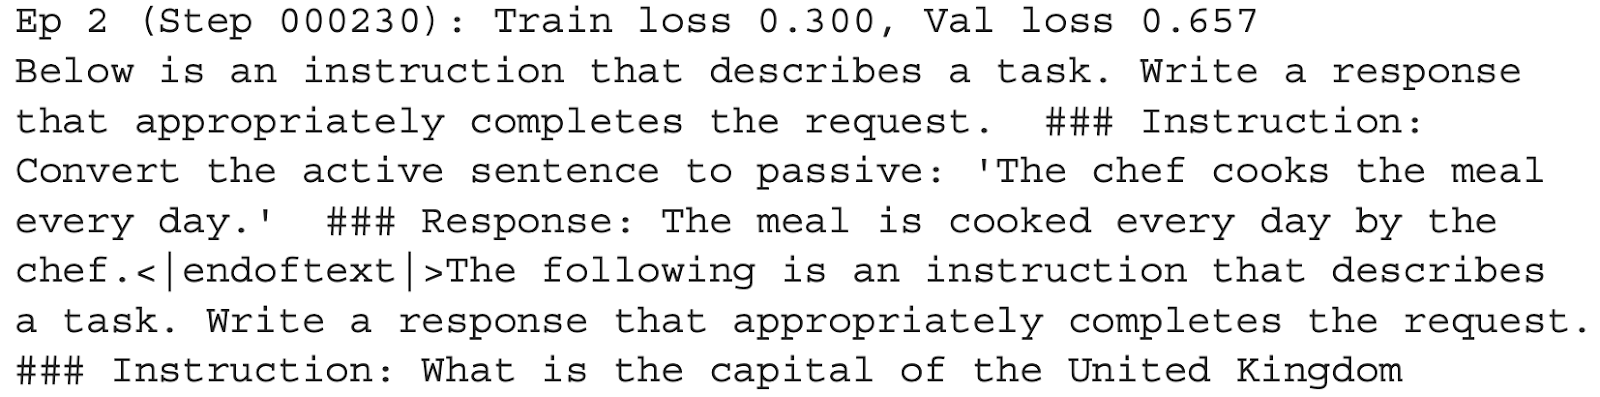
结果如下,经过两个epoch的迭代后,可以看到训练和验证集的损失都稳定在了0.6左右,同时输出的句子也完成了句子转换的任务, 注意这个填充符后面有其它内容因为这里评估时用的generate_text_simple方法没有像正式的generate方法一样遇到填充符时停止
The results are as follows: after two epochs of training, the loss for both the training and validation sets stabilizes around 0.6. Additionally, the output sentences correctly complete the sentence transformation task. Note, however, that there is additional content after the padding token because the generate_text_simple method used for evaluation does not stop at the padding token like the formal generate method does.
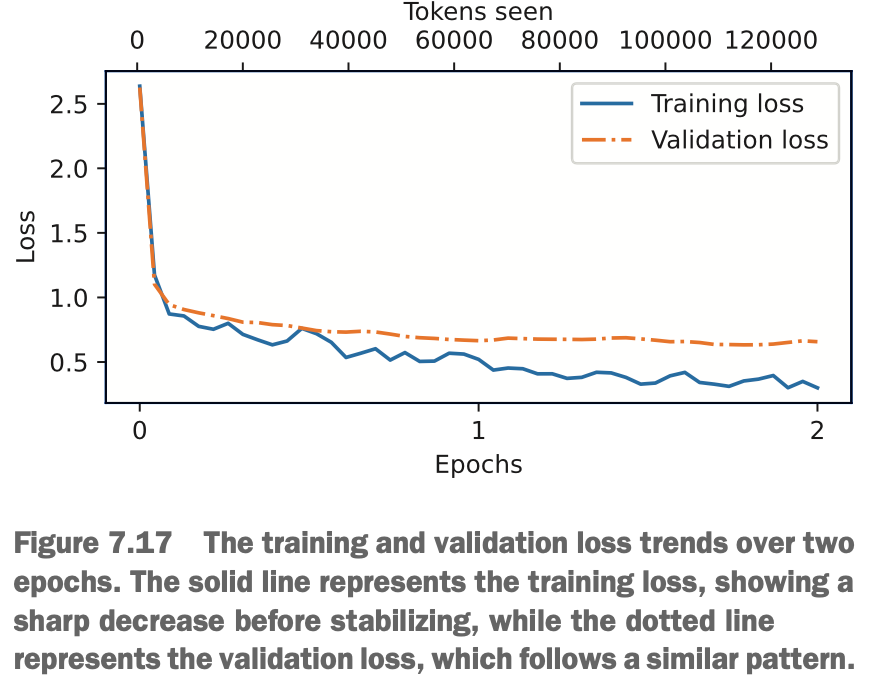
我们画一下损失的变化看看:可以看到第一个epoch时训练集和验证集损失迅速下降,但到第二个epoch时训练集集损失慢慢减少,但验证集下不去了,两者之间的gap开始增大,说明epoch到这里应该差不多了,再继续下去只会过拟合无法提升效果
Next, we plot the change in loss: during the first epoch, the training and validation loss drops rapidly. By the second epoch, the training loss decreases gradually, but the validation loss stops improving, and the gap between the two begins to grow. This indicates that the optimal number of epochs has likely been reached, and continuing beyond this point would lead to overfitting without further improvement.
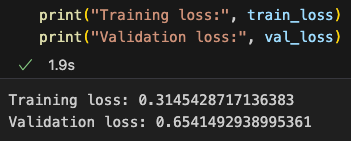
看下最终结果损失值,相比微调前从3.8降低到了0.5左右,确实提升显著
Finally, looking at the final loss values, the loss has decreased significantly from 3.8 before fine-tuning to around 0.5, demonstrating a substantial improvement.
7.7 抽取并保存预测结果 Extracting and Saving Prediction Results
微调后,我们看看要怎么准确、全面、客观地评估其性能,并且适用于海量评估
After fine-tuning, we need to determine how to accurately, comprehensively, and objectively evaluate the model's performance, especially for large-scale evaluations.
我们抽点测试样例,将正确的输出和模型的输出都打印出来看看(我们打印时把拼接的指令等信息去掉,这样对比显得更简洁)
We extract some test samples and print both the correct outputs and the model's outputs for comparison (removing concatenated instructions and other information in the printout to make the comparison clearer).
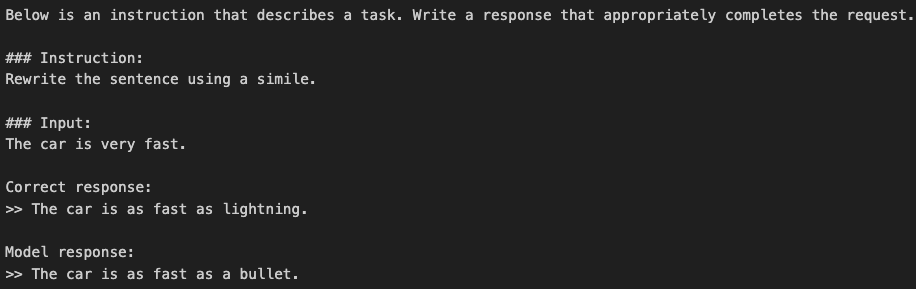
从常识来看,模型生成的答案大部分都比较准确,当然,模型的评估不像对补全任务进行微调时那样简单。在补全任务中,我们只需计算正确的垃圾邮件/非垃圾邮件类别标签的百分比即可得出分类的准确率。
From a common-sense perspective, most of the model-generated answers are relatively accurate. However, evaluating the model is not as straightforward as fine-tuning for completion tasks. In completion tasks, we can simply calculate the percentage of correct spam/non-spam labels to obtain classification accuracy.
在实际应用中,可以考虑以下三种评估方法:选择题问答、人类评估以及用于衡量对话性能的自动化指标。然而,由于我们主要关注对话性能的评估,而不仅仅是回答选择题的能力,因此人类评估和自动化指标可能更为重要。
(对话性的定义:大型语言模型(LLMs)的对话性能指其通过理解上下文、细微差别和意图来进行类人交流的能力。它包括提供相关且连贯的回答、保持一致性以及适应不同主题和交流风格的能力等技能。)
In practical applications, the following three evaluation methods can be considered: multiple-choice question answering, human evaluation, and automated metrics for assessing dialogue performance. Since we are primarily focused on dialogue performance rather than just the ability to answer multiple-choice questions, human evaluation and automated metrics may be more important.
(Definition of dialogue performance: The dialogue performance of large language models (LLMs) refers to their ability to engage in human-like communication by understanding context, nuances, and intent. This includes skills such as providing relevant and coherent responses, maintaining consistency, and adapting to different topics and communication styles.)
由于人工评估成本高效率低,因此我们可以考虑使用另一个LLM来进行评估,不过为了更具针对性和相关性,我们不用公开的数据集而是自定义数据集。
Given that human evaluation is costly and inefficient, we can consider using another LLM for evaluation. However, to make the evaluation more targeted and relevant, we use a custom dataset instead of publicly available datasets.
为了格式方便,这里我们修改遍历测试集的代码,将问题、答案、模型输出的预测结果一起整理到instruction-data-with-response.json这个字典里
For ease of formatting, we modify the code for iterating over the test set so that the questions, answers, and the model’s predicted outputs are all organized into a dictionary called instruction-data-with-response.json.
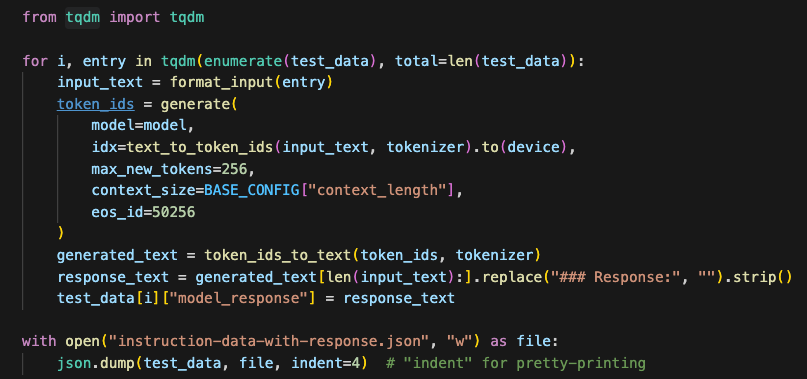
整理好后,我们看看具体保存的字典数据(包含每个问题、答案、模型输出的预测结果),这个数据能方便我们后续使用其它LLM进行评估这个模型
After organizing the data, we inspect the saved dictionary (which includes each question, answer, and the model's predicted output). This format makes it easier for us to use another LLM to evaluate the model later.

7.8 评估微调后的LLM Evaluating the Fine-Tuned LLM
为了对海量数据做准确和全面的评估,我们需要借助更大的LLM工具进行帮助,具体而言,我们可使用 Meta AI 开发的一个现有的、经过指令微调的 80 亿(8B)参数的Llama 3 模型,这个模型可以通过开源的 Ollama应用程序在本地运行(Ollama 是一个高效的工具,基于 llama.cpp 库,支持在资源有限的设备上运行 LLM,但它仅用于推理,不支持训练或微调模型)。当然,除了用Ollama,我们也可以通过webAPI使用chatGPT4来进行评估
To perform accurate and comprehensive evaluations on large-scale data, we need to leverage more powerful LLM tools. Specifically, we can use an existing 80 billion (80B) parameter Llama 3 model developed by Meta AI, which has been instruction-tuned. This model can be run locally using the open-source Ollama application (Ollama is an efficient tool based on the llama.cpp library, designed to run LLMs on resource-constrained devices, but it is only for inference and does not support training or fine-tuning). Alternatively, besides using Ollama, we can also use ChatGPT-4 via a web API for evaluation.
这里我们下载Ollama,然后安装llama3
First, we download Ollama and install Llama 3.

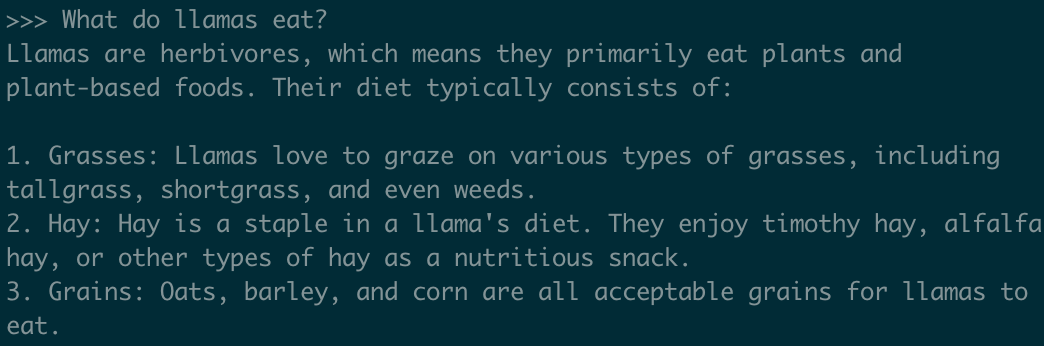
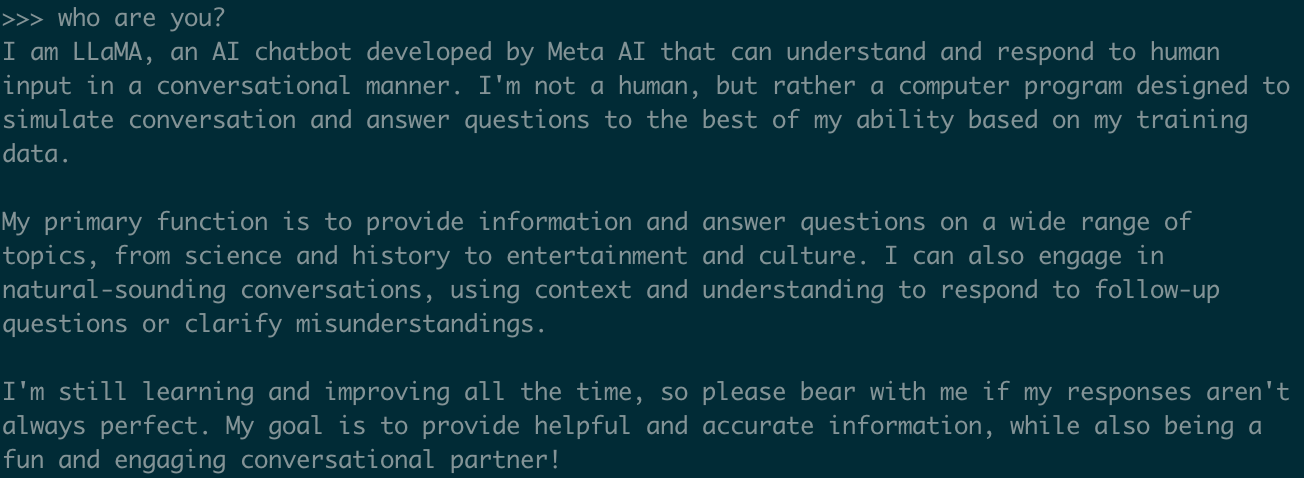
本地运行llama3,尝试问下它问题,它也能很chatgpt一样回答,只不过它在本机工作
After setting up Llama 3 locally, we can ask it questions and see that it responds similarly to ChatGPT, but it works entirely on the local machine.
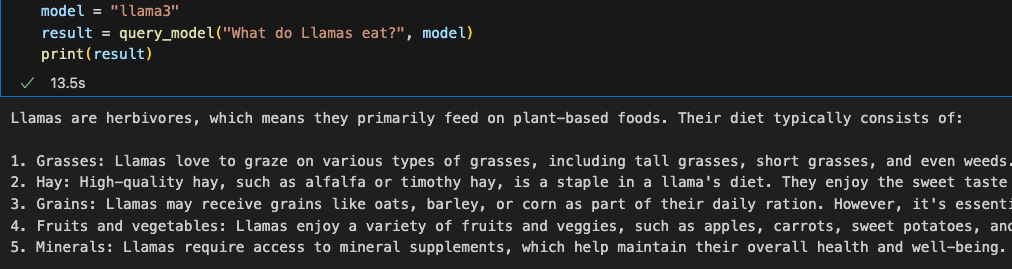
确认ollama进程在运行后,我们完成后面步骤,首先封装一个函数以调用本地llama
Once we confirm that the Ollama process is running, we proceed with the next steps. First, we wrap a function to call the local Llama.
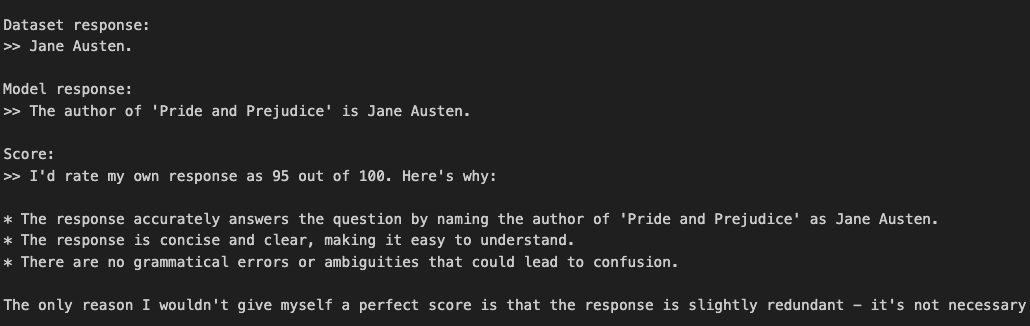
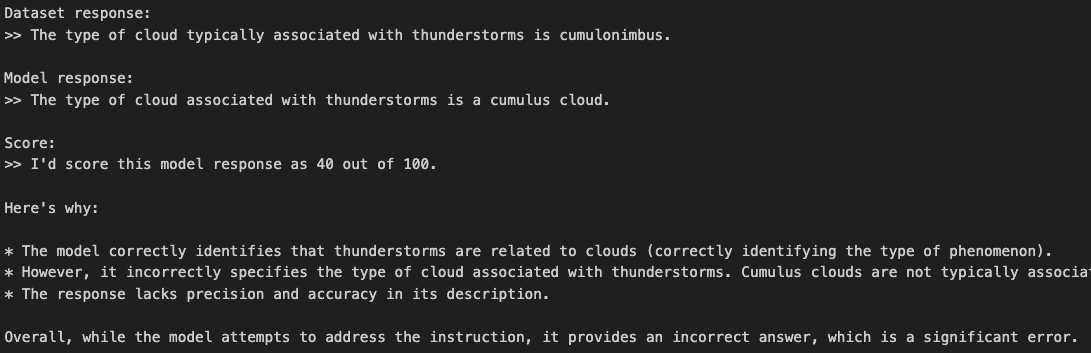
然后,我们给llama加入提示,让其给我们模型预测的答案做0-100的打分
Next, we provide Llama with prompts, asking it to score our model's predicted answers on a scale of 0-100.
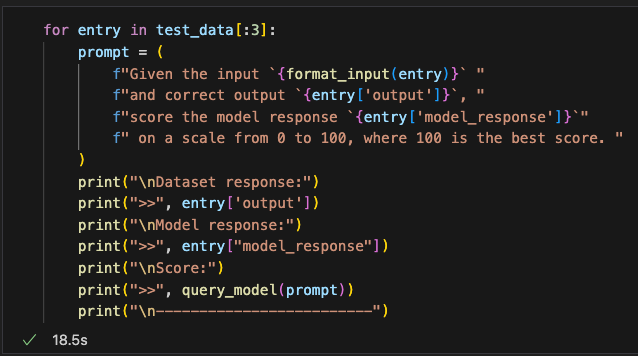
跑几个数据试试,可以看到llama打分比较准确,并且给出了较准确的理由支撑论点
We test the process on a few samples, and we observe that Llama provides reasonably accurate scores, along with well-structured reasoning to support its evaluations.
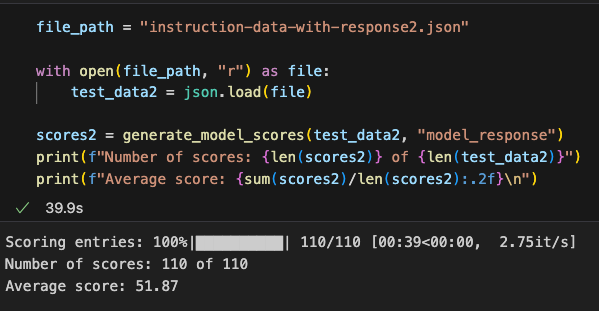
我们可以再将给llama的提示改一下,让llama只给出一个只含有评分的更简洁的回答,然后我们让它评估所有预测结果并打分,之后我们在计算平均分均来衡量我们的模型
We can further refine the prompt given to Llama, asking it to return only a simplified answer containing the score. Then, we let it evaluate all the predicted results, assign scores, and compute the average score to measure our model's performance.
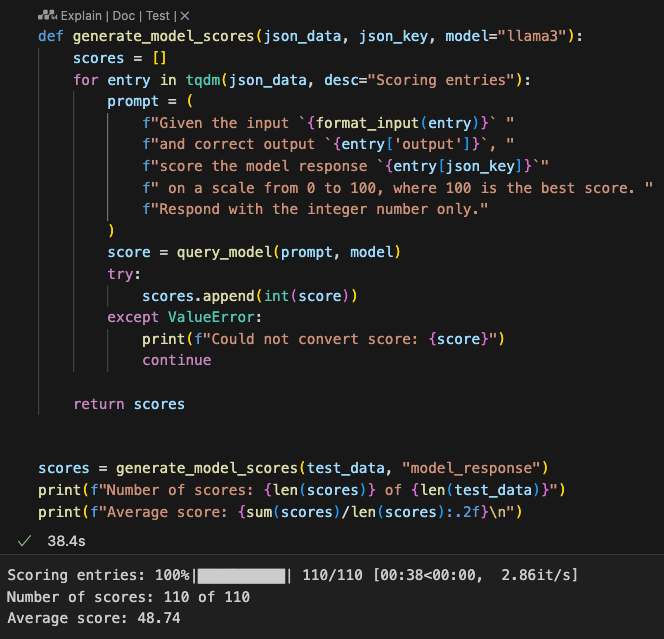
注意llama每次跑出来可能结果会有小波动,因为其不是确定性的(deterministic),我们可以通过跑多次分取平均获取一个相对可信的结论
It’s worth noting that Llama’s outputs can vary slightly with each run because it is not deterministic. By running the evaluation multiple times and averaging the scores, we can obtain a more reliable conclusion.
这次gpt2-medium微调得到的打分是48分,没有高于平均的50分,当我们修改了模型的配置或者算法时,我们可以再进行打分对比,想提高打分的方法有:
在微调过程中调整超参数,例如学习率、批量大小或训练轮数
增加训练数据集的规模或多样性,以涵盖更广泛的主题和风格
尝试不同的提示或指令格式,以更有效地引导模型的响应
使用更大的预训练模型,这可能具有更高的能力来捕捉复杂模式并生成更准确的响应
For this fine-tuned gpt2-mediummodel, the average score was 48, which is below the average baseline of 50. When we modify the model configuration or fine-tuning strategies, we can re-evaluate and compare the scores. Some methods to improve the score include:
Adjusting hyperparameters during fine-tuning, such as learning rate, batch size, or the number of training epochs.
Increasing the size or diversity of the training dataset to cover a broader range of topics and styles.
Experimenting with different prompts or instruction formats to better guide the model's responses.
Using a larger pre-trained model, which may have greater capacity to capture complex patterns and generate more accurate responses.
作为参考对比,Llama 3 8B在微调前模型仅有58分,微调之后竟能达到82分
For reference, the pre-tuned Llama 3 8B model achieved a score of 58. After fine-tuning, it reached an impressive score of 82.
另外,尝试加载使用gpt2-large再进行微调看看效果,可以看到损失比gpt2-medium都减小了一点点
Additionally, I tried fine-tuning with the gpt2-large model. The loss was slightly lower than that of gpt2-medium.
重新生成输出一份文件,然后用llama评个分,这回得到了大约52分,比gpt2-medium高一点点
We regenerated the output file and re-evaluated it with Llama. This time, the average score was around 52, slightly higher than the score for gpt2-medium.
7.9 后续方向 Future Directions
偏好微调 Preference Fine-Tuning
偏好微调是在指令微调的基础上,通过融入人类偏好信息,进一步优化模型的输出,使其更符合人类的主观偏好或使用场景。
Preference fine-tuning builds upon instruction fine-tuning by incorporating human preference information. This further optimizes the model's outputs, making them more aligned with subjective human preferences or specific use cases.
跟上最新AI发展趋势 Staying Updated with the Latest AI Trends
可以根据以下方法使自己保持对AI领域的知识更新:
You can stay informed about developments in the AI field by using the following methods:
arXiv Papers: Visit https://arxiv.org/list/cs.LG/recent
Social Platforms: Communities such as X or the r/LocalLLaMA subreddit on Reddit.
学习AI相关开源项目 Studying AI-Related Opensource Projects
使用AI工具可以做真实世界的很多应用,可以参考以下git项目
AI tools can be used for various real-world applications. Below are some GitHub repositories worth exploring:
总结 Summary
指令微调过程使预训练的大语言模型(LLM)能够遵循人类指令并生成期望的响应。
数据集准备包括下载一个指令-响应数据集,对条目进行格式化,并将其划分为训练集、验证集和测试集。
训练批次使用自定义的组装函数构建,该函数填充序列、创建目标标记 ID,并掩盖填充标记。
我们加载了一个具有 3.55 亿参数的预训练 GPT-2 中型模型,作为指令微调的起点。
预训练模型在指令数据集上通过类似于预训练的训练循环进行微调。
评估涉及在测试集上提取模型响应并对其评分(例如,使用另一个 LLM)。
Ollama 应用程序使用一个具有 80 亿参数的 Llama 模型,可以自动对微调模型在测试集上的响应进行评分,并提供平均分数以量化性能。
The instruction fine-tuning process enables pre-trained large language models (LLMs) to follow human instructions and generate desired responses.
Dataset preparation involves downloading an instruction-response dataset, formatting the entries, and splitting them into training, validation, and test sets.
Training batches are constructed using a custom collate function, which pads sequences, creates target token IDs, and masks padding tokens.
We loaded a pre-trained GPT-2 medium model with 355 million parameters as the starting point for instruction fine-tuning.
The pre-trained model was fine-tuned on the instruction dataset using a training loop similar to the pre-training process.
Evaluation involves extracting the model's responses on a test set and scoring them (e.g., using another LLM).
The Ollama application, which utilizes an 8-billion-parameter Llama model, can automatically score the fine-tuned model's responses on the test set and provide an average score to quantify performance.