博客内容Blog Content
公钥与私钥 Public and Private Key, HTTPS
在理解公钥跟私钥的时,发现了这篇有趣的图解小文章,与大家共享 While trying to understand public and private keys, I came across this interesting illustrated article and wanted to share it with everyone.
公钥与私钥 public and private keys
1)鲍勃有两把钥匙,一把是公钥,另一把是私钥
Bob has two keys: one is a public key, and the other is a private key.
2)鲍勃把公钥送给他的朋友们----帕蒂、道格、苏珊----每人一把。
Bob gives his public key to his friends—Patty, Doug, and Susan—each receiving a copy.
3)苏珊要给鲍勃写一封保密的信。她写完后用鲍勃的公钥加密,就可以达到保密的效果。
Susan wants to write a confidential letter to Bob. After writing it, she encrypts it using Bob's public key, ensuring that the letter remains confidential.

4)鲍勃收信后,用私钥解密,就看到了信件内容。这里要强调的是,只要鲍勃的私钥不泄露,这封信就是安全的,即使落在别人手里,也无法解密。
Once Bob receives the letter, he uses his private key to decrypt it and reads the content. It’s important to emphasize that as long as Bob’s private key remains secure, the letter is safe—even if it falls into someone else’s hands, they won’t be able to decrypt it.
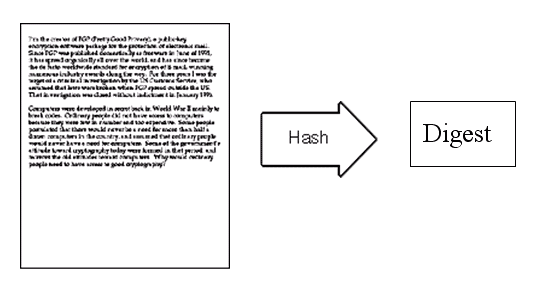
5)鲍勃给苏珊回信,决定采用"数字签名"。他写完后先用Hash函数,生成信件的摘要(digest)。
Bob decides to use a "digital signature" when replying to Susan. After writing the letter, he first uses a hash function to generate a digest of the message.
6)然后,鲍勃使用私钥,对这个摘要加密,生成"数字签名"(signature)。
Then, Bob uses his private key to encrypt this digest, creating a "digital signature."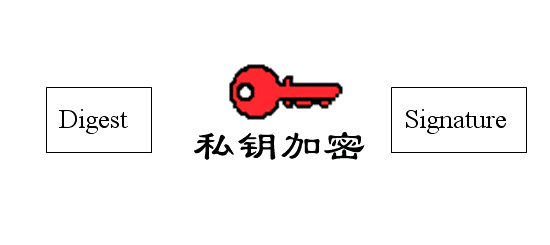
7)鲍勃将这个签名,附在信件下面,一起发给苏珊。
Bob attaches this signature to the letter and sends them together to Susan.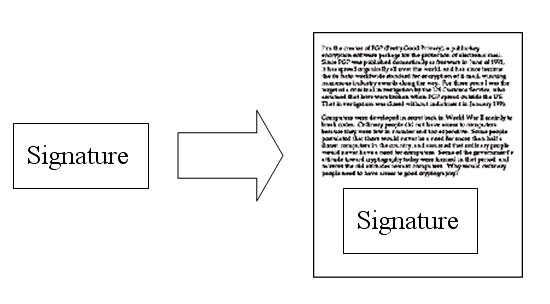
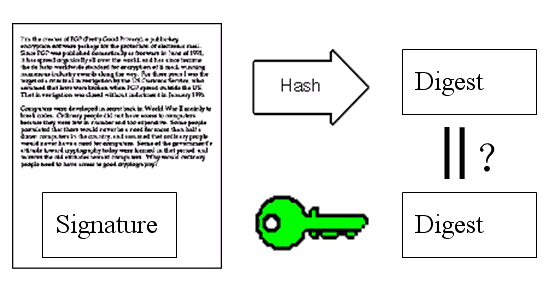
8)苏珊收信后,取下数字签名,用鲍勃的公钥解密,得到信件的摘要。由此证明,这封信确实是鲍勃发出的。
After receiving the letter, Susan removes the digital signature and decrypts it using Bob’s public key to obtain the message digest. This proves that the letter was indeed sent by Bob.

9)苏珊再对信件本身使用Hash函数,将得到的结果,与上一步得到的摘要进行对比。如果两者一致,就证明这封信未被修改过。
Susan then applies a hash function to the letter itself and compares the result with the digest obtained in the previous step. If the two match, it proves that the letter has not been altered.
10)复杂的情况出现了。道格想欺骗苏珊,他偷偷使用了苏珊的电脑,用自己的公钥换走了鲍勃的公钥。此时,苏珊实际拥有的是道格的公钥,但是还以为这是鲍勃的公钥。因此,道格就可以冒充鲍勃,用自己的私钥做成"数字签名",写信给苏珊,让苏珊用假的鲍勃公钥进行解密。
A complex situation arises. Doug wants to deceive Susan, so he secretly uses Susan’s computer and replaces Bob’s public key with his own public key. At this point, Susan unknowingly possesses Doug’s public key but still believes it’s Bob’s. As a result, Doug can impersonate Bob by using his own private key to create a "digital signature" and write a letter to Susan. When Susan receives the letter, she will use the fake Bob’s public key (which is actually Doug’s) to decrypt the signature.

11)后来,苏珊感觉不对劲,发现自己无法确定公钥是否真的属于鲍勃。她想到了一个办法,要求鲍勃去找"证书中心"(certificate authority,简称CA),为公钥做认证。证书中心用自己的私钥,对鲍勃的公钥和一些相关信息一起加密,生成"数字证书"(Digital Certificate)。
Later, Susan starts to sense something is wrong and realizes she cannot be sure if the public key truly belongs to Bob. She comes up with a solution: she asks Bob to go to a "Certificate Authority" (CA) to get his public key certified. The Certificate Authority uses its own private key to encrypt Bob’s public key along with some related information, creating a "Digital Certificate."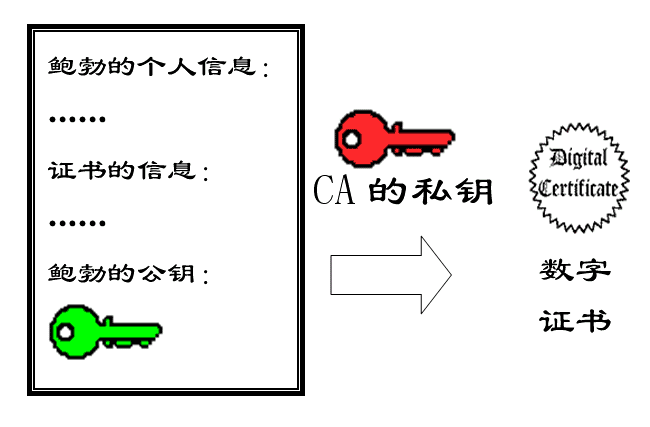
12)鲍勃拿到数字证书以后,就可以放心了。以后再给苏珊写信,只要在签名的同时,再附上数字证书就行了。
After obtaining the digital certificate, Bob can feel secure. From then on, whenever he writes to Susan, he can simply attach the digital certificate along with his signature.

13)苏珊收信后,用CA的公钥解开数字证书,就可以拿到鲍勃真实的公钥了,然后就能证明"数字签名"是否真的是鲍勃签的。
When Susan receives the letter, she uses the CA's public key to decrypt the digital certificate, which allows her to obtain Bob's real public key. She can then verify whether the "digital signature" was truly signed by Bob.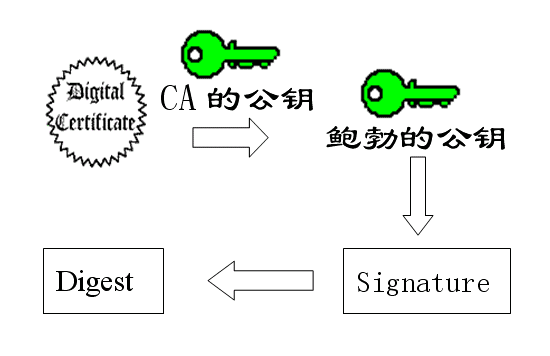
HTTPS详解 Detailed Explanation of HTTPS
HTTPS的核心是,为了获得一个真正的公钥,需要经过CA验证:
The core of HTTPS is that, in order to obtain a genuine public key, it must be verified by a Certificate Authority (CA).
具体来说,流程如下:
1. 服务器生成密钥对:服务器首先生成一对密钥,包括一个私钥和一个公钥。私钥保存在服务器上,公钥将被包含在证书中。
2. 申请证书:服务器管理员将公钥提交给CA,并申请一个数字证书。与此同时,管理员还需提供一些其他信息,如域名、组织信息等。
3. CA验证:CA会对提交的信息进行验证,以确保申请者确实拥有对该域名的控制权。这通常涉及对域名注册信息的验证、发送验证邮件等多种方式。
4. CA签发证书:一旦验证通过,CA会使用它的私钥对服务器提供的公钥进行签名,并生成一个数字证书。这个证书包含了公钥、域名、组织信息、有效期以及CA的数字签名等信息。
5. 服务器配置证书:服务器管理员将这个数字证书安装到服务器上。此后,当客户端请求HTTPS连接时,服务器会将该证书发送给客户端。
6. 客户端验证证书:客户端(通常是浏览器)会对服务器发来的证书进行验证:
- 浏览器检查证书的有效期。
- 浏览器检查证书是否由受信任的CA签发。
- 浏览器检查证书中的域名是否与用户访问的域名一致。
- 浏览器验证证书上的数字签名是否有效(通过使用CA的公钥进行验证)。
7. 公钥的安全性:如果所有验证都通过,客户端就可以信任证书中的公钥是真实且未被篡改的。接着,客户端会使用这个公钥来加密会话密钥,从而与服务器进行加密通信。
The process works as follows:
1. Server Generates a Key Pair: The server first generates a pair of keys, including a private key and a public key. The private key is kept on the server, while the public key will be included in the certificate.
2. Certificate Application: The server administrator submits the public key to a CA and requests a digital certificate. Along with the public key, the administrator also provides additional information, such as the domain name and organization details.
3. CA Verification: The CA verifies the submitted information to ensure that the applicant indeed has control over the domain. This verification typically involves checking domain registration details, sending validation emails, among other methods.
4. CA Issues Certificate: Once the verification is complete, the CA uses its private key to sign the server's public key, generating a digital certificate. This certificate includes the public key, domain name, organizational information, validity period, and the CA's digital signature.
5. Server Configures Certificate: The server administrator installs this digital certificate on the server. From that point on, when a client requests an HTTPS connection, the server will send this certificate to the client.
6. Client Verifies Certificate: The client (usually a web browser) will validate the certificate sent by the server:
- The browser checks the certificate's validity period.
- The browser checks whether the certificate was issued by a trusted CA.
- The browser checks whether the domain name in the certificate matches the domain the user is trying to access.
- The browser verifies the digital signature on the certificate (using the CA's public key).
7. Security of the Public Key: If all the checks pass, the client can trust that the public key in the certificate is genuine and has not been tampered with. The client then uses this public key to encrypt the session key, enabling encrypted communication with the server.
